Skip to content
  • Home
  • Pricing
  • Support
  • Download
  • My account
auto rigger
  • Home
  • Pricing
  • Support
    • Documentation
    • Tutorials
    • Create A Ticket
    • Contact Us
    • Changelog
  • Download
MY ACCOUNT
auto rigger

Setup Arise

6
  • Introduction
  • System Requirements
  • Create Account / Login
  • Installation
  • License Activation Instructions
  • Troubleshooting

Getting Started Tutorial

8
  • Interfaces (UI)
  • How To Prepare The Model For Rigging?
  • What Are Nodes, Attachments, and Presets?
  • What Are Guides?
  • What is The Attribute Editor?
  • Let’s Start Rigging
  • How To Export Rigs?
  • Digging Deeper

Elements

29
  • Node
  • Attachment
  • Presets
  • Attribute Editor And Attributes Types
  • Workspace
  • Outliner
  • Guides
  • Connections
  • Loading/Saving
  • Placeholders
  • Dump_grp
  • Skinning Joints
  • Poses
  • Group Node
  • Rig Base Node
  • Helper Tools
  • Preferences
  • Scene Settings
  • Log Viewer
  • Model Validation Checks
  • Model Updater
  • AI Auto Guides Placement
  • Rig Mocap Tester
  • Rig Export
  • Batch Menu
  • Sticky Note
  • API Commands
  • Custom Ctrls Shapes
  • Ctrl Shapes Lookup

How To Create Your Own Node

6
  • The Basics On How To Create Your Own Node
  • Creating Attributes
  • Creating Guides
  • IoJoint
  • IoTransform
  • Example Node Module

How To Create Your Own Attachment

1
  • Creating Custom Attachments in Arise

Basic Nodes

8
  • Base Node
  • One Joint
  • FK Chain
  • IK Chain
  • Two Joints IK
  • Dynamic FK Chain
  • Eye
  • Path

CA Nodes

12
  • CA_Spine
  • CA Head
  • CA Leg
  • CA Arm
  • CA Fingers
  • CA_Mouth
  • CA Eye
  • CA Quadruped Back Leg
  • CA Quadruped Front Leg
  • CA Ribbon
  • CA Tentacle
  • CA Wing

Attachments

22
  • SpaceSwitch
  • CtrlsShape
  • CtrlsSettings
  • MakeDynamic
  • FollowSkeleton
  • PostScript
  • MovablePivot
  • HelperJoints
  • Rename
  • AttributesSettings
  • CustomDriver
  • CustomDriven
  • ManualConnections
  • AddJoints
  • AddGroupAbove
  • JointsSettings
  • Parent
  • AddAttribute
  • ConnnectAttribute
  • HumanIK
  • CtrlsLockHideAttributes
  • CtrlsLimitAttributes

Mechanical

2
  • Vehicle Body
  • Wheel
View Categories
  • Home
  • Arise Docs
  • Elements
  • Model Updater

Model Updater

If the character model changes after rigging has already begun, it usually means that the rigging process has to start over, but with ARISE it is easy to update any rig’s model quickly.
The ‘Model Updater’ will transfer skinning from an old model to a new model, then you can reposition the Guides to match the new model’s anatomy, and your rig will be updated.


As of version 1.06.01, Arise now supports the transfer of blendshapes (WIP).
A ‘transfer blendshape’ checkbox will appear if the following conditions are met:

  • The old and new models have matching vertex orders.
  • The old model has a blendshape node connected before the skinCluster node.

This tool is optional; if you prefer to manually update your model, feel free to do so.

Before starting, prepare your new model in a separate Maya scene and check the model.
Maintain the same mesh names across versions, and if possible, maintain the same topology.

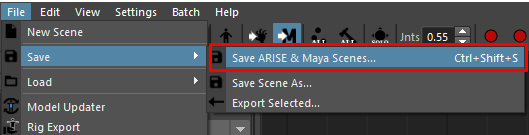
Then in the rigging scene, open the Model Updater, ‘File’ menu -> ‘Model Updater’.
It is a good idea to save both the Maya and the Arise scenes before continuing.

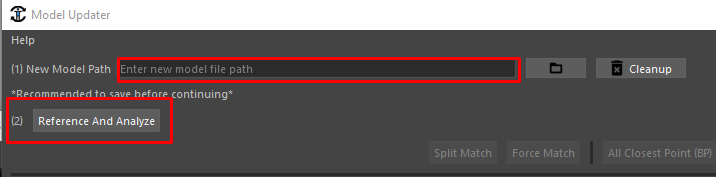
Enter the path to the new model scene you prepared earlier in the ‘New Model Path’ field and press ‘Reference and Analyze’.
This loads the new model as a (temporary) reference, analyzes the meshes within, and compares them to previously imported meshes (the old model) in the scene (only meshes previously imported using ‘Model Updater’).
Mesh names are used to compare and find matches.

Three types of items will be displayed in the table widget:

  • Match: An old mesh and a new mesh that share the same name will be combined into one ‘Match’ item.
  • Source Only: A mesh from your OLD model that has no match.
  • Target Only: A mesh from your NEW model that has no match.

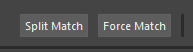
‘Split Match’ splits a selected ‘Match’ item into ‘Source Only’ and ‘Target Only’ items.
‘Force Match’ combines the selected ‘Source Only’ and ‘Target Only’ into one ‘Match’ item.

Matches whose old mesh has a skinCluster will have ‘Transfer Method’ options with the best option already selected.
The best option will be based on vertex count and boundingBox ‘health’.
You can transfer the weights using the different methods as many times as you want by pressing the ‘Transfer’ button and seeing the results.

‘Transfer Method’ options:

  • Closest Point On Surface (Bind Pose): If the topology changed, but the shape is about the same.
  • Vertex ID: If the shape has changed but the topology has not.
  • UV Space: If the UV layouts are similar.
  • Closest Point On Surface: Used to transfer skinning based on distance.
    You can pose the old rig (old model) before transferring weights to better fit the new model.
  • Ignore: Does nothing on the next ‘Transfer’ button press.
  • Remove SkinCluster: If weights have already been transferred and you wish to remove them.

Weights can also be transferred manually in any way you like.

Once you are happy with the weight transfer results, you can click ‘Finalize And Close’ to remove the old model and import the new one.

Cleanup:
If you wish to cancel the process at any time between pressing ‘Reference And Analyze’ and pressing ‘Finalize And Close’, you can press ‘Cleanup’ to remove the new model.

Blendshapes:
At the moment, the ‘Model Updater’ does not support transferring blendshapes. Even so, if the old and new meshes have the same topology, you can still save the blendshapes using Maya’s ‘Pose Editor’ or ‘Shape Editor’ export options and then load them back onto the new mesh (check Maya’s documentation).

Technical Logic:
The logic behind this tool is as follows:

  1. Temporarily reference the new model in your rig scene.
  2. Compare new and old model meshes based on matching names.
  3. In a UI, display the compared meshes and allow the user to match or unmatch the old and new meshes.
  4. Different weight transfer options are presented to the user, with the best option being selected by default.
  5. The user can test the results.
  6. After the user is satisfied with the results, he can click ‘Finalize and Close’, which will delete the old meshes and import the new ones.

Watch Video Tutorial 

_____________________________________________
Get Arise at: https://www.ariserigging.com

Updated on May 13, 2026

What are your Feelings

Share This Article :

  • Facebook
  • X
  • LinkedIn
  • Pinterest
Model Validation ChecksAI Auto Guides Placement
  • Home
  • Pricing
  • Support
  • My account
  • Privacy Policy
  • EULA

Copyright © 2026 - Arise Rigging System

This website uses cookies to ensure you get the best experience. By using this site, you agree to our use of cookies.
Accept
Manage consent

Privacy Overview

This website uses cookies to improve your experience while you navigate through the website. Out of these, the cookies that are categorized as necessary are stored on your browser as they are essential for the working of basic functionalities of the website. We also use third-party cookies that help us analyze and understand how you use this website. These cookies will be stored in your browser only with your consent. You also have the option to opt-out of these cookies. But opting out of some of these cookies may affect your browsing experience.
Necessary
Always Enabled
Necessary cookies are absolutely essential for the website to function properly. These cookies ensure basic functionalities and security features of the website, anonymously.
CookieDurationDescription
cookielawinfo-checkbox-analytics11 monthsThis cookie is set by GDPR Cookie Consent plugin. The cookie is used to store the user consent for the cookies in the category "Analytics".
cookielawinfo-checkbox-functional11 monthsThe cookie is set by GDPR cookie consent to record the user consent for the cookies in the category "Functional".
cookielawinfo-checkbox-necessary11 monthsThis cookie is set by GDPR Cookie Consent plugin. The cookies is used to store the user consent for the cookies in the category "Necessary".
cookielawinfo-checkbox-others11 monthsThis cookie is set by GDPR Cookie Consent plugin. The cookie is used to store the user consent for the cookies in the category "Other.
cookielawinfo-checkbox-performance11 monthsThis cookie is set by GDPR Cookie Consent plugin. The cookie is used to store the user consent for the cookies in the category "Performance".
viewed_cookie_policy11 monthsThe cookie is set by the GDPR Cookie Consent plugin and is used to store whether or not user has consented to the use of cookies. It does not store any personal data.
Functional
Functional cookies help to perform certain functionalities like sharing the content of the website on social media platforms, collect feedbacks, and other third-party features.
Performance
Performance cookies are used to understand and analyze the key performance indexes of the website which helps in delivering a better user experience for the visitors.
Analytics
Analytical cookies are used to understand how visitors interact with the website. These cookies help provide information on metrics the number of visitors, bounce rate, traffic source, etc.
Advertisement
Advertisement cookies are used to provide visitors with relevant ads and marketing campaigns. These cookies track visitors across websites and collect information to provide customized ads.
Others
Other uncategorized cookies are those that are being analyzed and have not been classified into a category as yet.
SAVE & ACCEPT