Back to ‘Basics On How To Create Your Own Node‘
ATTRIBUTES_CREATION METHOD:
In the attributes_creation() method, you create the attributes that will populate the Arise Attribute Editor.
Each command that creates an attribute returns a pointer of the attribute object, or None if something went wrong.
You can access the attribute value in other methods by storing it as a class variable (example: self.my_attribute).
Name, version, and note attributes are automatically created.
You can create visual display elements that help group or space between attributes using the following commands:
- self.add_separator(title=None) Add a line separator (a display element).

Arguments:- title {str or None} — optional text on separator (default: {None})
- title {str or None} — optional text on separator (default: {None})
- self.add_frame_layout(title=None)
Add a frame layout to group visually all attributes and elements created after, until a call to close_layout() is called. Note that for each call of add_*_layout creation there should be a call to close_layout().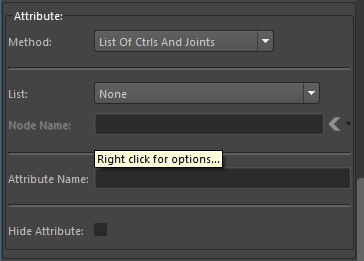
Arguments:- title {str or None} — optional text on frame (default: {None})
- title {str or None} — optional text on frame (default: {None})
- self.add_collapsible_layout(title=None, shown=False)
Add a collapsible layout to group visually and show/hide all attributes and elements created after, until a call to close_layout() is called. Note that for each call of add_*_layout creation there should be a call to close_layout().
Arguments: - self.close_layout()Closes any open layout created by calling add_frame_layout() or add_collapsible_layout().
There should be a call to close_layout() for every layout created.
You can create different types of attributes using the following commands:
- self.add_rgb_color_attribute(name, default_value=(1, 1, 1), value_change_method=None, writable=True, readable=True, promoted=False, annotation=””)
Add an RGB (no alpha) attribute to change a color.
Arguments:
Class variable you can access:
- value {list} — returns the attribute value [R, G, B]
- enabled {bool} –returns True if enabled False if not
Class methods you can use:
- set_disabled(bool) — True to disable False to enable
- self.add_float_attribute(name, value_change_method=None, default_value=0.0, writable=True, readable=True, promoted=False, min_value=None, max_value=None, annotation=””, button=None)
Add a float attribute.
Arguments:- name {str} — unique name for attribute
- value_change_method {method pointer or None} — if we want a method to execute on value change provide the method here else None (default: {None})
- default_value {float} — float default values (default: {0.0})
- writable {bool} — can have incoming connections (default: {True})
- readable {bool} — can have outgoing connections (default: {True})
- promoted {bool} — at creation is the attribute visible on node shape (default: {False})
- min_value {float or None} — min value user can input (default: {None})
- max_value {float or None} — max value user can input (default: {None})
- button {list or None} — list with method pointer and 3 strings: method_ptr, label, icon path, tooltip
- annotation {str} — tool-tip text (default: {“”})
- help_link {str} — creates an optional button that opens the provided website link (default: {“”})
Class variable you can access:
- value {float} — returns the attribute value
- enabled {bool} –returns True if enabled False if not
Class methods you can use:
- set_disabled(bool) — True to disable False to enable
- self.add_float_multiplier_attribute(name, value_change_method=None, default_value=0.0, annotation=””)
Add a float attribute that is limited between 0.0 – 1.0 and has a slider.
Arguments:- name {str} — unique name for attribute
- value_change_method {method pointer or None} — if we want a method to execute on value change provide the method here else None (default: {None})
- default_value {float} — float default values (default: {0.0})
- annotation {str} — tool-tip text (default: {“”})
- help_link {str} — creates an optional button that opens the provided website link (default: {“”})
Class variable you can access:
- value {float} — returns the attribute value
- enabled {bool} –returns True if enabled False if not
Class methods you can use:
- set_disabled(bool) — True to disable False to enable
- self.add_integer_attribute(name, default_value=0, value_change_method=None, writable=True, readable=True, promoted=False, annotation=””, min_value=0, max_value=None, add_slider=False)
Add a integer attribute.
Arguments:- name {str} — unique name for attribute
- default_value {int} — float default values (default: {0})
- value_change_method {method pointer or None} — if we want a method to execute on value change provide the method here else None (default: {None})
- writable {bool} — can have incoming connections (default: {True})
- readable {bool} — can have outgoing connections (default: {True})
- promoted {bool} — at creation is the attribute visible on node shape (default: {False})
- annotation {str} — tool-tip text (default: {“”})
- help_link {str} — creates an optional button that opens the provided website link (default: {“”})
- min_value {float or None} — min value user can input (default: {0})
- max_value {float or None} — max value user can input (default: {None})
- add_slider {bool} — True to add a slider widget next to input widget
Class variable you can access:
- value {int} — returns the attribute value
- enabled {bool} –returns True if enabled False if not
Class methods you can use:
- set_disabled(bool) — True to disable False to enable
- self.add_xyz_attribute(name, default_value=(0, 0, 0), writable=True, readable=True, promoted=False, annotation=””)
Add an XYZ attribute (double 3).
Arguments:- name {str} — unique name for attribute
- default_value {tuple} — of 3 floats for XYZ (default: {(0, 0, 0)})
- writable {bool} — can have incoming connections (default: {True})
- readable {bool} — can have outgoing connections (default: {True})
- promoted {bool} — at creation is the attribute visible on node shape (default: {False})
- annotation {str} — tool-tip text (default: {“”})
- help_link {str} — creates an optional button that opens the provided website link (default: {“”})
Class variable you can access:
- value {list} — returns the attribute value [X, Y, Z]
- enabled {bool} –returns True if enabled False if not
Class methods you can use:
- set_disabled(bool) — True to disable False to enable
- self.add_driver_attribute(name, annotation=””)
Add a driver attribute that can drive a ‘driven_attributes‘ on anther Arise nodes.
This attribute appears only on the node itself and not in the Arise Attribute Editor.
Within the ‘rig_creation()‘ method you can specify a Maya transform as the associated driver object.
The setup process for both the driver attribute and the driven attribute is explained here.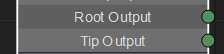
Arguments:- name {str} — unique name for attribute
- annotation {str} — tool-tip text (default: {“”})
- help_link {str} — creates an optional button that opens the provided website link (default: {“”})
- self.add_driven_attribute(name, connection_type=”matrix_constraint”, annotation=””, promoted=True, maintain_offset=True, parent_relative=False, force_connection=False, force_when_locked=False, skip_attrs=(False, False, False, False, False, False, False, False, False))
Add a driven attribute that can be driven by a ‘driver_attribute‘ or by str name of a Maya transform object.
Within the ‘rig_creation()‘ method you can specify a Maya transform as the associated driven object.
The setup process for both the driver attribute and the driven attribute is explained here.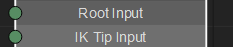

Arguments:- name {str} — unique name for attribute
- connection_type {str} — what kind of connection to create. Valid options: “matrix_constraint”, “parent”, “direct_connect”, “parent_constraint”, “point_constraint”, “orient_constraint”, “scale_constraint”, “aim_constraint”, “parent_and_scale_constraint”. default {“matrix_constraint”}
- annotation {str} — tool-tip text (default: {“”})
- help_link {str} — creates an optional button that opens the provided website link (default: {“”})
- promoted {bool} — is this attribute shape visible on node shape by default (default: {True})
- maintain_offset {bool) — True to maintain offset. If connection_type is ‘parent’, False will zero the relative transformation. Ignored by ‘direct_connect’ connection type. (default: {True})
- parent_relative {bool) — True to parent relatively. Useful when jnts parenting creates transforms above parented jnts. Only relevant for ‘parent’ connection type (default: {False})
- force_connection {bool} — for each attribute on driven node, if it’s already connected should it force a connection. Ignored by ‘parent’ connection type. (default: {False})
- force_when_locked {bool} — for each attribute on driven node, if it’s already locked should it force a connection. Ignored by ‘parent’ connection type. (default: {False})
- skip_attrs {tuple} — 9 bools for each attribute ‘tx’, ‘ty’, ‘tz’, ‘rx’, ‘ry’, ‘rz’, ‘sx’, ‘sy’, ‘sz’, should it skip constraining/connection to that attribute. Ignored by “parent” connection type. (default: {(False, False, False, False, False, False, False, False, False)})
- self.add_node_attribute(name, annotation=””, node_type=”transform”)
Add a string input attribute that takes a long name of a Maya node.
Arguments:- name {str} — unique name for attribute
- annotation {str} — tooltip str of widgets (default: {“”})
- help_link {str} — creates an optional button that opens the provided website link (default: {“”})
- node_type {str} — the type of node you wish as input (default: {“transform”})
Class variable you can access:
- value {str} — returns the attribute value
- enabled {bool} –returns True if enabled False if not
Class methods you can use:
- set_disabled(bool) — True to disable False to enable
- self.add_string_attribute(name, default_value=””, annotation=””, set_str_validator=True)
Add str input attribute that takes text input from the user.
Arguments:- name {str} — unique name for the attribute
- default_value {str} — default string value (default: {“”})
- annotation {str} — tooltip str of widgets (default: {“”})
- help_link {str} — creates an optional button that opens the provided website link (default: {“”})
- set_str_validator {bool} — True input str can only be valid Maya name characters, False any keyboard character is valid.
Class variable you can access:
- value {str} — returns the attribute value
- enabled {bool} –returns True if enabled False if not
Class methods you can use:
- set_disabled(bool) — True to disable False to enable
- self.add_boolean_attribute(name, default_value=False, value_change_method=None, annotation=””)
Add a checkbox attribute.
Arguments:- name {str} — unique name for attribute
- default_value {bool} — bool default values (default: {False})
- value_change_method {method pointer or None} — if we want a method to execute on value change provide the method here else None (default: {None})
- annotation {str} — tool-tip text (default: {“”})
- help_link {str} — creates an optional button that opens the provided website link (default: {“”})
Class variable you can access:
- value {bool} — returns the attribute value (True or False)
- enabled {bool} –returns True if enabled False if not
Class methods you can use:
- set_disabled(bool) — True to disable False to enable
- self.add_drop_down_attribute(name, items, default_value=””, value_change_method=None, annotation=””)
Add a drop-down/enum attribute.
Arguments:- name {str} — unique name for attribute
- items {list} — of strings options to populate the dropdown attribute
- default_value {str} — name of the option we want as the default value (default: {“”})
- value_change_method {method ptr or None} — if we want a method to execute on value change provide the method here else None (default: {None})
- annotation {str} — tool-tip text (default: {“”})
- help_link {str} — creates an optional button that opens the provided website link (default: {“”})
Class variable you can access:
- value {str} — returns the selected option in the dropdown
- enabled {bool} –returns True if enabled False if not
Class methods you can use:
- set_disabled(bool) — True to disable False to enable
- self.add_radio_attribute(name, items, default_value=0, annotation=””)
Add a radio attribute with with up to 6 radio buttons.
Arguments:- name {str} — unique name for attribute
- items {list} — of string options (up to 6) to populate the radio attribute with
- default_value {int} — index of option we want as default value (default: {0})
- annotation {str} — tool-tip text (default: {“”})
- help_link {str} — creates an optional button that opens the provided website link (default: {“”})
Class variable you can access:
- value {int} — returns the index of the selected radio option
- display_value {str} — returns the string name of the selected radio option
- enabled {bool} –returns True if enabled False if not
Class methods you can use:
- set_disabled(bool) — True to disable False to enable
- self.add_path_attribute(name, value_change_method=None, file_types=””, annotation=””)
Add a path attribute to load a filepaths to scene.
Arguments:- name {str} — unique name for attribute
- value_change_method {method pointer or None} — if we want a method to execute on value change provide the method here else None (default: {None})
- file_types {str} — the files extensions that it should look for when opening a file browser (default: {‘Images (*.png *.xpm *.jpg)’})
- annotation {str} — tool-tip text (default: {“”})
- help_link {str} — creates an optional button that opens the provided website link (default: {“”})
Class variable you can access:
- value {str} — returns the attribute value
- enabled {bool} –returns True if enabled False if not
Class methods you can use:
- set_disabled(bool) — True to disable False to enable
- self.add_button(buttons)
Add 1 to 6 buttons.
Arguments:- buttons {list} — a list of lists where each list holds the data needed for 1 button (up to 6 buttons).
structure: [(click_method_pointer [ptr], _\icon_relative_path [str], btn_name [str], annotation [str]), (…), (…), …]
- buttons {list} — a list of lists where each list holds the data needed for 1 button (up to 6 buttons).
CUSTOM CONNECTIONS (New in version 1.03.02)
The primary means by which nodes connect is through constraining transforms and linking attributes using ‘add_driver_attribute‘ and ‘add_driven_attribute,’ as explained earlier.
In rare situations where you need to establish a unique connection between nodes, you can employ custom attributes.
Begin by declaring these attributes in the ‘attributes_creation‘ method. Then, assign values to these attributes using ‘set_maya_object()‘ within the ‘rig_creation()‘ method, this could be a node name, a list, or any data type.
Finally, to execute specific connections or operations, reimplement the ‘create_connections‘ method. This method will be called during the connection pass in the Arise build process.
When reimplementing the ‘create_connections‘ method, it’s important to handle any exception in your code, such as no connection value. Additionally, ensure the method returns False if the connection fails and True if it succeeds.
- self.add_custom_driver_attribute(name, str_connection_type=”attr”, slot_color=(150, 150, 150), writeable=False, annotation=””, allow_same_node_conn=False)
Add a custom driver attr that allows connecting anything since the connection is done by a method
on the attachment.
Within the ‘rig_creation()‘ method you can specify any value as the associated driver information.
The setup process is similar to the driver and driven attributes explained here. (using set_maya_object())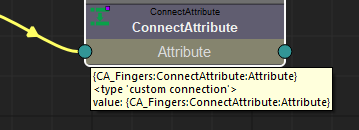
- Arguments:
- name {str} — unique name for attribute
- str_connection_type {str} — ‘custom_driven’ with the same value will allow connection (default: {“attr”})
- slot_color {list} — of 3 ints between 0-255 representing RGB color of slot
- writeable {bool} — True to have input and output slots on this attribute (default: {False})
- annotation {str} — tool-tip text(default: {“”})
- help_link {str} — creates an optional button that opens the provided website link (default: {“”})
- allow_same_node_conn {bool} True to allow connections on the same Arise node (default: {False}) [As of version 1.11.00]
Class variable you can access (from the ‘create_connections’ method):
- driver_attribute {custom driver attr or None} — The connected driver attribute or None if no connection
- driver_attribute.maya_object {any data type} — The driver attribute value
- maya_object {any data type} — The data assigned to the attribute
- self.add_custom_driven_attribute(name, str_connection_type=”attr”, slot_color=(150, 150, 150), readable=False, annotation=””, promoted=True)
Add a custom driven attr that allows connecting anything since the connection is done by a method
on the attachment.
Within the ‘rig_creation()‘ method you can specify any value as the associated driver information.
The setup process is similar to the driver and driven attributes explained here. (using set_maya_object())
Arguments:- name {str} — unique name for attr
- str_connection_type {str} — custom_driven with same value will allow connection (default: {“attr”})
- slot_color {list} — of 3 ints between 0-255 representing RGB color of slot
- readable {bool} — True to have input and output slots on this attribute (default: {False})
- annotation {str} — tool-tip text(default: {“”})
- help_link {str} — creates an optional button that opens the provided website link (default: {“”})
- promoted {bool} — is this attribute shape visible on node shape by default (default: {True})
Class variable you can access (from the ‘create_connections’ method):
- driver_attribute {custom driver attr or None} — The connected driver attribute or None if no connection
- driver_attribute.maya_object {any data type} — The driver attribute value
- maya_object {any data type} — The data assigned to the attribute
_____________________________________________
Get Arise at: https://www.ariserigging.com
Follow on LinkedIn


