Skip to content
  • Home
  • Pricing
  • Support
  • Download
  • My account
auto rigger
  • Home
  • Pricing
  • Support
    • Documentation
    • Tutorials
    • Create A Ticket
    • Contact Us
    • Changelog
  • Download
MY ACCOUNT
auto rigger

Setup Arise

6
  • Introduction
  • System Requirements
  • Create Account / Login
  • Installation
  • License Activation Instructions
  • Troubleshooting

Getting Started Tutorial

8
  • Interfaces (UI)
  • How To Prepare The Model For Rigging?
  • What Are Nodes, Attachments, and Presets?
  • What Are Guides?
  • What is The Attribute Editor?
  • Let’s Start Rigging
  • How To Export Rigs?
  • Digging Deeper

Elements

29
  • Node
  • Attachment
  • Presets
  • Attribute Editor And Attributes Types
  • Workspace
  • Outliner
  • Guides
  • Connections
  • Loading/Saving
  • Placeholders
  • Dump_grp
  • Skinning Joints
  • Poses
  • Group Node
  • Rig Base Node
  • Helper Tools
  • Preferences
  • Scene Settings
  • Log Viewer
  • Model Validation Checks
  • Model Updater
  • AI Auto Guides Placement
  • Rig Mocap Tester
  • Rig Export
  • Batch Menu
  • Sticky Note
  • API Commands
  • Custom Ctrls Shapes
  • Ctrl Shapes Lookup

How To Create Your Own Node

6
  • The Basics On How To Create Your Own Node
  • Creating Attributes
  • Creating Guides
  • IoJoint
  • IoTransform
  • Example Node Module

How To Create Your Own Attachment

1
  • Creating Custom Attachments in Arise

Basic Nodes

8
  • Base Node
  • One Joint
  • FK Chain
  • IK Chain
  • Two Joints IK
  • Dynamic FK Chain
  • Eye
  • Path

CA Nodes

12
  • CA_Spine
  • CA Head
  • CA Leg
  • CA Arm
  • CA Fingers
  • CA_Mouth
  • CA Eye
  • CA Quadruped Back Leg
  • CA Quadruped Front Leg
  • CA Ribbon
  • CA Tentacle
  • CA Wing

Attachments

22
  • SpaceSwitch
  • CtrlsShape
  • CtrlsSettings
  • MakeDynamic
  • FollowSkeleton
  • PostScript
  • MovablePivot
  • HelperJoints
  • Rename
  • AttributesSettings
  • CustomDriver
  • CustomDriven
  • ManualConnections
  • AddJoints
  • AddGroupAbove
  • JointsSettings
  • Parent
  • AddAttribute
  • ConnnectAttribute
  • HumanIK
  • CtrlsLockHideAttributes
  • CtrlsLimitAttributes

Mechanical

2
  • Vehicle Body
  • Wheel
View Categories
  • Home
  • Arise Docs
  • Elements
  • AI Auto Guides Placement

AI Auto Guides Placement

{New in version 1.07.00} 

The ‘AI Auto Guides Placements’ tool help to automatically position the guides on a humanoid character using Machine Learning (ML) pose detection models.

To access the tool, navigate to: ‘Edit‘ menu → ‘Guides‘ → ‘AI Auto Guides Placement‘

The AI tool operates by analyzing images captured as the camera rotates around the character. It identifies ‘landmarks’ in each image, and then calculates the most accurate average of those positions in 3D space.

Requirements:

  • Maya 2023 or higher
  • An active Arise license

Upon use, Arise will automatically install any required open-source Python libraries.

The AI tool utilizes three different models for positioning:

  • Body model – Positions nodes such as: (L_/R_) CA_Leg, (L_/R_) CA_arm, CA_Spine, and CA_Head.
  • Fingers model – Positions nodes such as: (L_/R_) CA_Fingers.
  • Face model – Positions nodes such as: (L_/R_) CA_Eye and CA_Mouth.
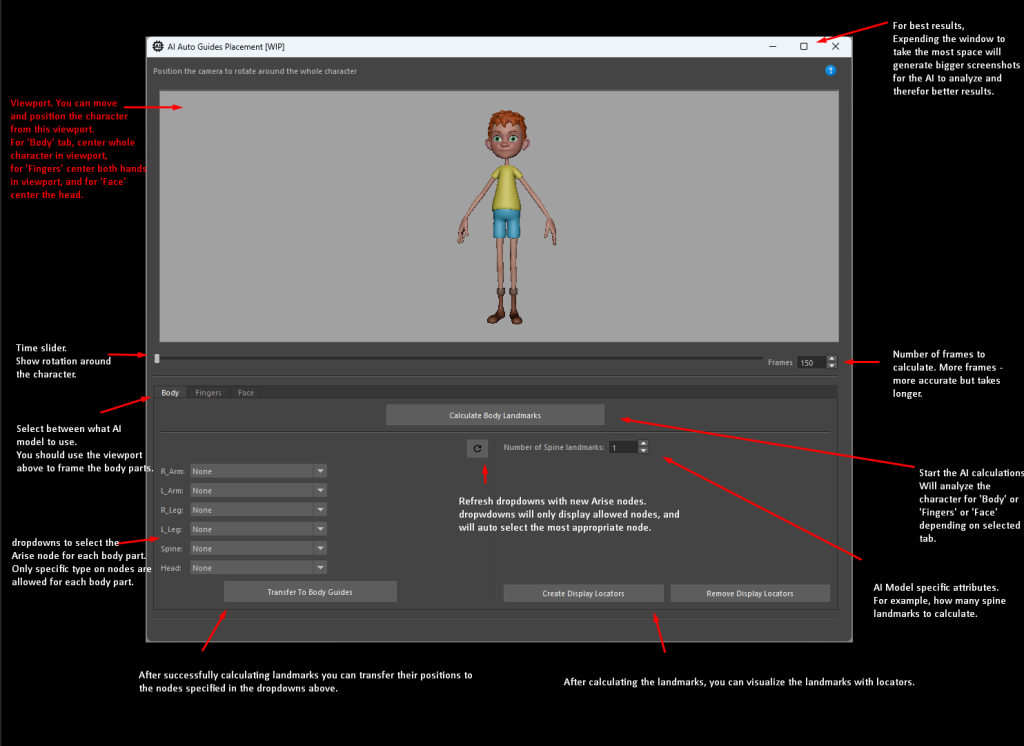
UI overview:

(Click to enlarge)

Viewport:
The top section contains a viewport linked to a rotating camera focused on the character model. Adjust the viewport to target relevant body parts depending on the selected model:

  • Body Model: Center the entire body.
  • Fingers Model: Center both hands.
  • Face Model: Center the head.

For optimal results, maximize the tool window size to capture larger screenshots, which enhances AI accuracy.

Timeline Slider:
Below the viewport is a slider controlling the timeline, showing you the rotation around the body parts the AI will analyze.
Ensure body parts remain within the frame as the camera rotates.

Frame Count:
Located next to the slider, this count determines the AI’s precision. Higher frame counts improve accuracy but increase computation time.

Model Tabs:
The bottom half of the UI contains tabs for each model: Body, Fingers, and Face.

  • The top button of each tab calculate the landmarks of each model. After centering the character either whole-body, hands, or face in the viewport and setting the frame count, you can press this button to let the AI calculate it’s landmarks.
  • To view the calculated landmarks you can click on “Create Display Locators” and a locator will be created for each landmark.
  • The dropdowns for the different body parts will be populated with only allowed nodes and will automatically try and choose the appropriate node.
  • Next to the dropdowns is a ‘refresh‘ button to repopulate the dropdowns with any new nodes added to Arise.
  • On the right side of each tab, model-specific attributes can be adjusted, such as the number of spine or eye landmarks to calculate.
  • The ‘Transfer To Body/Fingers/face Guides‘ button takes the positions of calculated landmarks and transfers them to the guides of the nodes specified in the dropdowns.

Notes:

  • If you see the warning ‘No landmarks identified,’ it means the AI could not detect a character in the images. Try the tips below to improve the AI’s results.
  • The AI analyzes the screenshot of your model to identify character features. Therefore, you should apply textures to your model, hide unnecessary models, smooth the model if needed, or make other adjustments to make the model look complete/realistic.
  • In certain cases, a model’s texture can interfere with the AI’s ability to detect landmarks. In these situations, switching to a shaded display without textures (by pressing 5 on the keyboard) can improve detection accuracy.
  • Changing the background to create more contrast between the character and its surroundings can help improve AI accuracy. To do this, press ‘Alt’ + ‘B’ to adjust the background color.
  • The open-source (Apache License Version 2.0) AI models are trained on consented images of real human images and therefore will provide better results on realistic humanoid characters, but good results have been successfully tested on stylized cartoon humanoids too.
  • The bigger the viewport the larger the image the AI can analyze and therefore provide better results, therefore, make the AI tool window as big as possible.
  • More frames give more samples for the AI to analyze, but takes longer to compute.
  • If you use the ‘CA_Biped_With_Face‘ preset, all dropdown should be populated correctly in all tabs. 


_____________________________________________
Get Arise at: https://www.ariserigging.com

Updated on May 13, 2026

What are your Feelings

Share This Article :

  • Facebook
  • X
  • LinkedIn
  • Pinterest
Model UpdaterRig Mocap Tester
  • Home
  • Pricing
  • Support
  • My account
  • Privacy Policy
  • EULA

Copyright © 2026 - Arise Rigging System

This website uses cookies to ensure you get the best experience. By using this site, you agree to our use of cookies.
Accept
Manage consent

Privacy Overview

This website uses cookies to improve your experience while you navigate through the website. Out of these, the cookies that are categorized as necessary are stored on your browser as they are essential for the working of basic functionalities of the website. We also use third-party cookies that help us analyze and understand how you use this website. These cookies will be stored in your browser only with your consent. You also have the option to opt-out of these cookies. But opting out of some of these cookies may affect your browsing experience.
Necessary
Always Enabled
Necessary cookies are absolutely essential for the website to function properly. These cookies ensure basic functionalities and security features of the website, anonymously.
CookieDurationDescription
cookielawinfo-checkbox-analytics11 monthsThis cookie is set by GDPR Cookie Consent plugin. The cookie is used to store the user consent for the cookies in the category "Analytics".
cookielawinfo-checkbox-functional11 monthsThe cookie is set by GDPR cookie consent to record the user consent for the cookies in the category "Functional".
cookielawinfo-checkbox-necessary11 monthsThis cookie is set by GDPR Cookie Consent plugin. The cookies is used to store the user consent for the cookies in the category "Necessary".
cookielawinfo-checkbox-others11 monthsThis cookie is set by GDPR Cookie Consent plugin. The cookie is used to store the user consent for the cookies in the category "Other.
cookielawinfo-checkbox-performance11 monthsThis cookie is set by GDPR Cookie Consent plugin. The cookie is used to store the user consent for the cookies in the category "Performance".
viewed_cookie_policy11 monthsThe cookie is set by the GDPR Cookie Consent plugin and is used to store whether or not user has consented to the use of cookies. It does not store any personal data.
Functional
Functional cookies help to perform certain functionalities like sharing the content of the website on social media platforms, collect feedbacks, and other third-party features.
Performance
Performance cookies are used to understand and analyze the key performance indexes of the website which helps in delivering a better user experience for the visitors.
Analytics
Analytical cookies are used to understand how visitors interact with the website. These cookies help provide information on metrics the number of visitors, bounce rate, traffic source, etc.
Advertisement
Advertisement cookies are used to provide visitors with relevant ads and marketing campaigns. These cookies track visitors across websites and collect information to provide customized ads.
Others
Other uncategorized cookies are those that are being analyzed and have not been classified into a category as yet.
SAVE & ACCEPT