Creating your own attachment is more advanced and requires solid Python skills and a good understanding of how Arise works.
We strongly recommend gaining experience creating custom nodes in Arise before attempting to build custom attachments.
Since version 1.13.00, all Arise node and attachment modules are provided as uncompiled .py files.
This makes it easier to study how they work, create new versions, or new attachments for Arise.
FOLDER STRUCTURE:
The attachment folder structure mirrors the node structure.
To start a new attachment, go to: ‘arise\io_modules\io_modules_attachments‘.
Here you can duplicate an existing attachment folder and modify the duplicate according to the steps below:
- Rename the top-level folder to your new attachment’s name.
- If there are any, delete any numbered folders under ‘version’ folder except for ‘001‘.
- Under ‘versions/001‘, delete the compiled (.pyc) file and create a new python file (.py) with the same name as the top folder.
- Update the icon: replace icon.png in the icon_folder with a 36x36px PNG.
- Later you can modify the ‘docs.html’ file under docs_folder with your own documentations in HTML.
PYTHON FILE STRUCTURE:
Use the template below as a starting point for your .py file.
Read through the comments carefully, they explain each section of the class.
"""Your attachment docstring here. """

import logging
import maya.cmds as mc
from arise.data_types.attachment_data import AttachmentData

LOGGER = logging.getLogger("node_rig_logger")

MAYA_VERSION = 2016  # Minimum supported Maya version.
AUTHOR = "Your Name Here"  # The attachment author.
RIG_TYPE = "Joints"  # Options: 'Ctrls', 'Joints', 'Connection', 'Customize', 'Script', or a new custom type.
RIG_CATEGORY = "Build"  # Either 'Build' or 'Post'.
TAGS = ["joint", "ctrls", "micro", "secondary", "tertiary", "extra"]
TOOL_TIP = "Write your hover over tooltip text here"


class YourAttachment(AttachmentData):  # ATTACHMENT CLASS NAME MUST MATCH MODULE NAME AND TOP FOLDER NAME!
    """Your attachment docstring here. """
    sort_priority = 100  # Determines position in the inventory attachment list.

    def __init__(self, parent, icon, docs, module_dict):
        AttachmentData.__init__(
            self,
            parent=parent,
            icon=icon,
            docs=docs,
            module_dict=module_dict,
        )

    @staticmethod
    def attachment_permissions(node):
        """Return True if attachment is allowed on the given node, otherwise False.

        Arguments:
            node {node shape pointer} -- node shape to check permission with

        Returns:
            bool -- True if allowed or False if not
        """
        # Example: node must have more than 2 joints.

        if len(node.node_data.joints_manager.joints_info_list) > 2:
            return True

        # Example of how to print a warning to Arise log viewer.
        module = __file__.rsplit("\\", 1)[-1].rsplit("/", 1)[-1].rsplit(".", 1)[0]
        LOGGER.warning(
            "Cannot add attachment '%s' to node '%s'. Node needs to have more than 2 joints.",
            module, node.name,
        )
        return False

    @staticmethod
    def support_multi_instances_on_node():  # REIMPLEMENTED!
        """Return True if more than one instance of this attachment is supported on a node. Default False."""
        return False

    @staticmethod
    def support_copy_settings():  # REIMPLEMENTED!
        """Return True if this attachment supports copying settings between nodes of same module.
        Reimplemented by subclasses that do support copy settings to return True. default is to return False.
        """
        # Some attachments (e.g. 'Parent') do not support copying settings by design.
        return True

    @property
    def category(self):  # REIMPLEMENTED!
        """Returns the category number. 1-'build', 2-'finalize'(not used), 3-'post'. """
        return 1  # Explained in more detail later.

    def attributes_creation(self):  # REIMPLEMENTED!
        """Here you add the module attributes. """

    def evaluate(self):  # REIMPLEMENTED!
        """Re-evaluate model. """
        # If you have attributes that should be disabled/enabled based on another attribute value, you set the condition here.
        # if you do not need this method delete it from your code.
        # for example: self.geo_node_attr.set_disabled(False if self.is_geo_display_attr.value else True)

        # Tree attributes will need a call to update their model here.

    def guides_creation(self):
        """Create guides here. Remove if not required."""

    def joints_creation(self):
        """Create joints here. Remove if not required."""

    def ctrls_creation(self):
        """Create ctrls here. Remove if not required."""

    def attachment_creation(self):  # REIMPLEMENTED!
        """Build the attachment rig here."""
- MAYA_VERSION – Any Maya version prior to this one will hide this node.
- RIG_CATEGORY, RIG_TYPE, and TAGS used by the Inventory UI for filtering.
- Class name, module name, and top folder name must all match exactly (no spaces).
WORKFLOW OVERVIEW:
After setting up an empty attachment, you can begin implementing it:
- Attributes – define in ‘attributes_creation’ method.
- Guides – optional, shown when the node enters Template mode.
- Joints – optional, declare any joints needed.
- Ctrls – optional, declare any ctrls needed.
- Attachment Creation – build the rig elements in ‘attachment_creation‘ method.
If the attachment only modifies existing ctrl/joint data (e.g. ‘CtrlsSettings’), this method may remain empty.
ATTACHMENT PERMISSION METHOD:
Use this method to define conditions under which the attachment can be added to a node.
For example, if the attachment requires a minimum number of joints, check the condition here and return True or False accordingly.
SUPPORT MULTI INSTANCES METHOD:
If your attachment can be added to the same node more than once, reimplement this method to return True.
Example: The ‘SpaceSwitch’ attachment supports multiple instances.
SUPPORT COPY SETTINGS METHOD:
If your attachment supports copying its stored values to another attachment of the same type, reimplement this method to return True.
Some attachments, like ‘Parent’, deliberately do not support copy settings because doing so would break the rig.
CATEGORY METHOD:
Reimplement this method to return either a 1 or a 3 integer.
Attachments have several categories they can be part of. When created, they will be positioned at the bottom of the same category attachments stack and can only be moved up and down in order with other attachments of the same category.
Meaning attachments of category 1 will always be above attachments of category 3.
Category 1 – ‘build’: Will mostly be attachments that modify the ctrls/joints infos on the fly, such as modifying their size and color. (Default)
Category 2 – ‘finalize’: Not being used at the moment.
Category 3 – ‘post’: For attachments that modify or add rig elements, that implement the ‘attachment_creation‘ to add more Maya nodes to the rig.
Category 4 – ‘script’: Should not be used! Only ‘PostScript’ should use this category as the last final pass of operations.
INTERNAL DATABASE:
Each attachment has an internal_database for storing any Python native data structures.
It supports undo/redo and save/load on the attachment data.
To save with undo support:
self.internal_database = []
To save without undo:
self.set_internal_database_no_undo([])
ATTRIBUTES_CREATION METHOD:
You can create the same attributes you can create on a node (Node attributes) and the same way.
Attachments unique attribute is the Tree attribute (a table-like UI).
Using this attribute lets the user access ctrls and/or joints values and modify them on the fly.
Using this attribute is not as easy as other attributes and require understanding it and several steps.
Looking at how other attachments that use it will go a long way in understanding it.
To create the tree attribute, in the attributes_creations’ method call on:
- add_tree_attribute(name, annotation=””, help_link=””)
Add a tree attribute to attachment (exclusive to attachments).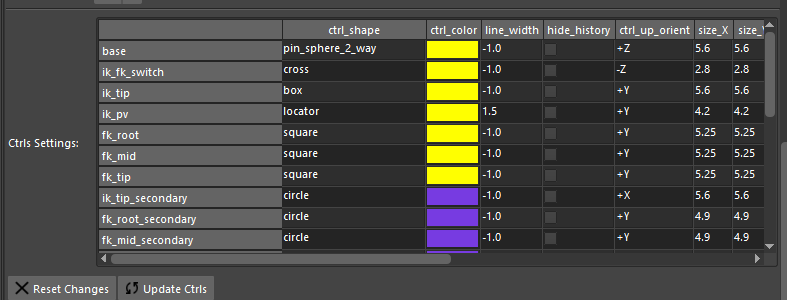
Arguments:- name {str} — name of the attribute
- annotation {str} — toolTip annotation to explain to user attribute use (default: {“”})
- help_link {str} — creates an optional button that opens the provided website link (default: {“”})
You must populate it with a data model (list of dicts).
To populate it we need to create a dict that will be inserted into its ‘model’:
Partial example from ‘CtrlsSettings’:
def ctrls_settings_model(self):
        """Return a ctrls settings model the attachment will use. """
        model_data = []
        for ctrl_info in self.top_node_data.ctrls_manager:
            data = {
                "info_pointer": ctrl_info,
                "name": ctrl_info.data_dict["default_name"],
                "attrs": [
                    {
                        "name": "ctrl_color",
                        "type": tuple,
                        "default_value": ctrl_info.data_dict["color"],
                        "change_pointer": (ctrl_info.data_dict, "color"),
                    },
                    {
                        "name": "line_width",
                        "type": float,
                        "range": [-1.0, 100],
                        "default_value": ctrl_info.data_dict["line_width"],
                        "change_pointer": (ctrl_info.data_dict, "line_width"),
                    },
                ],
            }

            model_data.append(data)

        return model_data
Each dictionary you append = one row in the Tree table.
The dictionary takes:
- “info_pointer”: ctrl_info – A direct pointer to the info object (In this case a ctrl info).
- “name”: ctrl_info.data_dict[“default_name”] – The display name shown on the left side of the table.
- “attrs”: A list of attribute dictionaries. Each attribute dictionary must have:
- “name”: “ctrl_color” – The attribute name displayed in the table header.
- “type”: tuple – Options are float (number field), bool (checkbox), tuple (color), list (dropdown), str (text field).
- “default_value”: ctrl_info.data_dict[“color”] – The starting value.
- “change_pointer”: (ctrl_info.data_dict, “color”) – To apply changes immediately, the attribute needs to know which value to update when the user edits it. This is specified in the “change_pointer”.
For attachments that don’t modify a ctrl or joint value, you can set “change_pointer” to False.
See the ‘FollowSkeleton’ attachment for an example.
The tree attribute is typically populated with ctrl infos and/or joint infos. These info objects correspond to the ctrls and joints declared in the ‘joints_creation()’ and ‘ctrls_creation()‘ methods. Each info object stores the data for the ctrl or joint that will be created when the node is built. (For more information).
The tree attribute bypasses the safe methods provided by the info objects and writes directly to their data_dict. Because of this, no validation is performed to ensure the new value is valid. When setting values through the tree attribute, take care to avoid incorrect data types or out-of-range values.
Since Tree attributes are dynamic, you must also refresh the model regularly.
To do this, reimplement the ‘evaluate’ method and update the model inside it.
def evaluate(self):  # REIMPLEMENTED!
        """Re-evaluate model. """
        AttachmentData.evaluate(self)
        self.tree_attr.update_model(self.ctrls_settings_model())
There’s more to learn about Tree attributes, but the best approach is to review existing attachment modules to see practical examples.
For an example of how to use the tree attribute in a more complex operation, beyond modifying ctrls or joints infos, see the ‘MakeDynamic‘ attachment module.
ON DUPLICATE METHOD:
This optional, ‘on_duplication‘, method allows you to run custom code whenever an attachment is duplicated.
Example: In the ‘ManualConnections’ attachment, stored values should not be carried over to the new node, as this would break the rig. To prevent this, the stored values are cleared during duplication.
ON DELETE METHOD:
This optional, ‘on_delete_operation‘, method lets you execute custom code before node elements are deleted, such as when switching a node to Template mode or rebuilding it.
Note: This method can be invoked multiple times because the cleanup process itself may run more than once. Ensure that any custom code you add is safe to execute repeatedly.
The ‘on_delete_operation‘ methods of attachments are executed first, followed by the node’s own ‘on_delete_operation‘ method.
Example: The ‘HumanIK’ attachment undefines its ctrls and joints before deletion to prevent the entire character definition from being removed.
_____________________________________________
Get Arise at: https://www.ariserigging.com
Follow on LinkedIn


